- How to change Windows on a laptop. Step-by-step instruction: how to install Windows XP on a newbie...
- How to reinstall the operating system
- How to create a bootable flash drive
- The procedure for installing on a netbook through my computer
- The procedure for installing on a netbook through the BIOS
How to change Windows on a laptop. Step-by-step instruction: how to install Windows XP on a newbie netbook. Switching the SATA hard disk controller to an IDE-compatible mode of operation
Usually on netbooks already installed operating system , so that customers can not worry and almost immediately start working with the device. However, not all users are satisfied. windows version , which they have, and they want to replace it with another. On the one hand, problems should not arise. But on the other hand - not all models have a netbook drive. What to do in this case?
Almost every operating system becomes slower over time and is no longer as fast and fluid as when buying a device. This is due to the fact that the operating system after a long use with many additional tools, advertising toolbars and other programs is full. This was due to the fact that the installations were not yet as simple as they are today, and on the other, the drivers. Of course, there are differences in performance when you take drivers directly from the manufacturer.
Switching the SATA hard disk controller to an IDE-compatible mode of operation
In this article, we would like to show you exactly that. With a few steps you can return the computer to its original state. First of all, we would like to switch to different modes that are available during reinstallation. Much more than a system scan for faulty and missing ones system files . Your personal information, photos or videos will not be included and will not be lost. This feature is useful when you want to delete everything from your computer. . The screenshot below shows two options for a new installation.
How to reinstall the operating system
How to reinstall windows on a netbook without a floppy drive is actually quite simple. The only thing you need to do is rewrite installation disk to usb media. This procedure can be done in several ways. Consider one of them.
First you need to copy to the computer iso-image of the system. After that, run the program UltraISO. In it, go to File-Open and select the previously copied image of the system. Go to Self-Loading, where we click on Write Disk Image. We insert a flash drive into a netbook and format it. Type of file system must be NTFS.
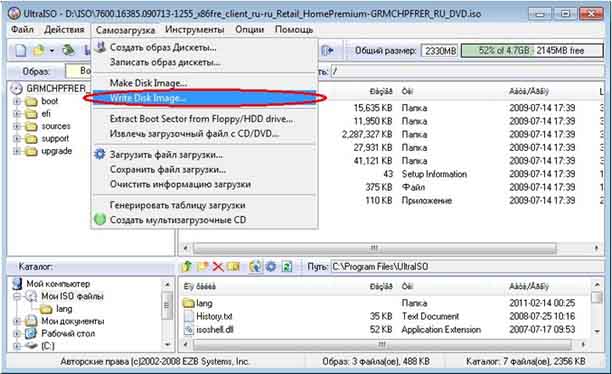
After the formatting is completed, we return to UltraISO . Go to the Open tab. Here click Record and confirm your actions OK. Now it remains to wait for the distribution of the distribution. Instead of a flash drive, you can use a memory card, removable HDD and other types of USB drive. After the operation is completed, the flash drive can be pulled out.
We received a USB-drive with a distribution kit written on it. The next stage is the entrance to Bios, where you need to install a boot from a memory card or flash drive . To do this, as soon as the netbook starts downloading, you should press a certain key. For different models of devices, it may differ; usually, the button for entering Bios is indicated in the instructions attached to the computer. After that we find the BOOT tab, where the order of loading is found. The first expose the USB-drive.
After the done operations, we boot from the flash drive, and then the installation is similar to how this procedure is done using the disk. The user just has to follow the prompts of the system, which are quite understandable. The last thing you need to do after reinstalling is to find and install drivers for this version of the operating system. In order to make the system interface more interesting, you can find out
Installation USB-drivers, so the user will have to create such a USB flash drive on their own. However, this is nothing complicated.
The method described in the article can be installed on the OS netbook Windows of different versions: XP, Vista, 7, 8. For this you need a flash drive with a memory capacity of more than 1 gigabyte, an image file of the desired operating system (the extension of such files is .iso) and the UltraISO utility (link to the free utility download is attached to the article).
How to create a bootable flash drive
1. Download the UltraISO utility from the official developer site, install and open it.
2. Open the tab “Load” -> “Burn image hard drive ".
3. In the window that appears, select the USB drive to be installed, then select the image file with the operating system and make sure that the USB-HDD + recording method is set.
4. Click on the “Write” button and wait for the process to finish.
The procedure for installing on a netbook through my computer
4. In the window that appears, select the installation of Windows.
5. After this will begin standard installation operating system. Follow the on-screen instructions and wait for the installation process to complete. During installation, your computer may reboot several times. As soon as you see the picture with the new Windows logo when it is loaded, it will mean that the installation has been completed in principle.
The disadvantage of this installation method is that you cannot format a disk on which a running operating system is installed. old version . If this option does not suit you, use the following method.
The procedure for installing on a netbook through the BIOS
As in the previous method, before starting the installation, back up the data.
1. Insert installation flash drive on netbook.
2. Restart the computer and enter the BIOS.
To enter the BIOS, it is necessary when the computer starts up, when the first graphic images appear on the screen, to press the DEL button on the keyboard, until the settings screen appears. This is the BIOS.
3. If the BIOS has a blue background — look at the left side of the Advanced BIOS Features section, use the arrows on the keyboard to move the pointer and press Enter. A window will appear with the boot options for your computer. Put in the First Boot Device - USB-HDD, Second Boot Device - CDROM, Third Boot Device - Hard Disk or HDD-0.
4. If the BIOS has a gray background, go to the Boot tab, then use the arrow keys to move the pointer to the Boot Device Priority and press Enter. The order of device boot on the computer appears. Change the order so that USB is first on the list, CD / DVD Disk is second, Hard Disk is third.
5. After setting the desired order, press F10 and Enter.
At this stage, the reader will set the boot order in which the flash drive is loaded first, then the drive, and only then the hard disk. In the future, such an order is not necessary to return to its previous state.
6. After that, the computer will restart, then the words Press will appear on the screen. The reader must press any button, and a new version "Windows" with a pre-inserted flash drive will begin to be installed.
7. Follow the on-screen instructions. Windows Installer and wait for the installation process to complete. During installation, your computer may reboot several times. As soon as you see the picture with the new Windows logo when it is loaded, it will mean that the installation has been completed in principle.
What to do in this case?